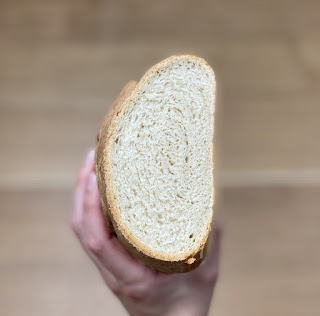
Basic Bloomer Bread
Making bread is nothing to be afraid of - anyone can do it! This recipe is for a very simple white loaf but you can use it as a base to experiment. You can change the type of flour, add flavourings such as seeds or spices or even swap the water for beer...
The smell of freshly baked bread wafting through your kitchen will no doubt bring a smile to your face and when you cut in and spread the first slice with butter, I promise that you will be overjoyed!
Basic Bloomer Bread
500g strong white flour, plus extra for kneading
10g salt
1 x 7g sachet of instant yeast
300ml warm water (body temperature)
40g melted butter or olive oil, plus extra for kneading
Put the flour into a large mixing bowl and add the butter/oil. Add the yeast at one side of the bowl and add the salt at the other, otherwise the salt will kill the yeast. Stir all the ingredients with a spoon to combine.
Add half of the water and turn the mixture round with your fingers. Continue to add water a little at a time, combining well, until you’ve picked up all of the flour from the sides of the bowl. You may not need to add all of the water, or you may need to add a little more – you want a dough that is well combined and soft, but not sticky or soggy.
Mix with your fingers to make sure all of the ingredients are combined and use the mixture to clean the inside of the bowl. Keep going until the mixture forms a rough dough.
By hand: Use about a teaspoon of oil to lightly grease a clean work surface (using oil instead of flour will keep the texture of the dough consistent). Turn out your dough onto the greased work surface (make sure you have plenty of space).
Fold the far edge of the dough into the middle of the dough, then turn the dough by 45 degrees and repeat. Do this several times until the dough is very lightly coated all over in olive oil. Now use your hands to knead the dough: push the dough out in one direction with the heel of your hand, then fold it back on itself. Turn the dough by 90 degrees and repeat. Kneading in this way stretches the gluten and makes the dough elastic. Do this for about 8-10 minutes until the dough is smooth and stretchy. Work quickly so that the mixture doesn’t stick to your hands – if it does get too sticky you can add a little flour to your hands.
By machine: Using the dough hook attachment, set your mixer to the second slowest speed and leave to knead for 5 minutes.
Clean and lightly oil your mixing bowl and put the dough back into it. Cover with a damp tea towel or lightly oiled cling film and set it aside to prove. This gives the yeast time to work: the dough should double in size. This should take around one hour, but will vary depending on the temperature of your room (don’t put the bowl in a hot place or the yeast will work too quickly).
Once the dough has doubled in size scrape it out of the bowl to shape it. The texture should be bouncy and shiny. Turn it out onto a lightly floured surface and knock it back by kneading it firmly to 'knock' out the air.
Use your hand to roll the dough up, then turn by 45 degrees and roll it up again. Repeat several times. Gently turn and smooth the dough into a round loaf shape. Place the loaf onto a baking tray sprinkled with flour or into a loaf tin. Cover with a tea towel or lightly oiled cling film and leave to prove until it’s doubled in size. This will take about an hour, but may be quicker or slower depending on how warm your kitchen is.
Preheat the oven to 220C/425F/Gas 7. Put an old, empty roasting tin into the bottom of the oven. Once the dough has doubled in size, sprinkle some flour on top and very gently rub it in. Use a large, sharp knife to make shallow cuts (about 1cm/½in deep) across the top of the loaf.
Put the loaf (on its baking tray or in its tin) into the middle of the oven. Pour a little water into the empty roasting tray at the bottom of the oven just before you shut the door – this creates steam which helps the loaf develop a crisp and shiny crust. Bake the loaf for 25 minutes then turn the oven down to 200C/400F/Gas 6 and bake for a further 10 minutes.
The loaf is cooked when it’s risen and golden. To check, take it out of the oven and tap it gently underneath – it should sound hollow. Turn onto a wire rack to cool.


Comments
Post a Comment